
xis ok

We may earn a commission if you buy through links on this page, at no extra cost to you. We only link products that are actually in our van (or clear shopper alternatives we name as such).

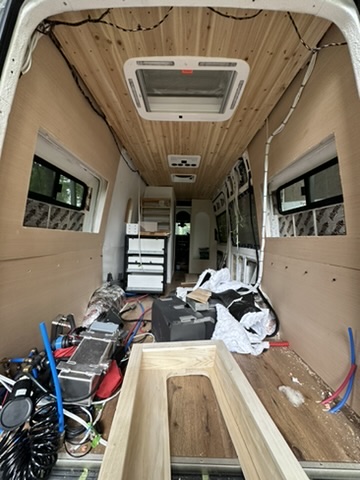
Insulation is the job you do once, on an empty shell, before the 80/20 and the clay. If you get it wrong you will be cutting finished walls open in a rest area. This is the stack in XPLRE and the order we put it in.

I designed the thermal side. Brittany had to live with the thickness, because every extra inch is an inch she does not get for an arch. The van is a 2021 Sprinter 2500, gas, 170 in high roof. We leave HVAC on and hike. The Yorkie mix, tuxedo kitten, and grey cat stay in the house. The large dog is in the garage. Moisture and heat have to go somewhere.

What we were solving for

A Sprinter is not a house. Wall cavities are about 1.5–1.75 in. You will not get residential R-values. You are buying time for the heater and the AC.

Moisture matters more than the R-value table. One person exhales a lot of water overnight. Cooking and showers add more. Condensation on bare metal is rust later. A roof fan on low at night solves more moisture problems than upgrading the batt.

Use rigid foam on the floor. Compressible wool or Thinsulate underfoot loses the air that makes it work. Use flexible fiber in ribs, curves, and doors. Rigid board does not fill a Sprinter wall. Kilmat / butyl mats are sound, not insulation. Put them on the big flat drum panels. Do not count them as an R-layer. Skip fiberglass. It sags, holds water, and smells.

We did not pick one material and declare a winner. We stacked five things, each for a job the others do not do.

The stack we actually installed

Inside to the metal, in the order we applied it:

  1. LizardSkin ceramic + LizardSkin sound (Henkel TEROSON Thermal Control, IDH 3124339) on clean metal. This is the first skin. It sticks. It takes the first thermal hit. It is not the whole wall.
  2. Havelock wool, 16×48×2 batts, rated R-7 for that batt, stuffed into cavities and ribs. Do not compress it flat. The air is the insulation.
  3. Kilmat on the big flat panels. Sound only. If a box told you Kilmat is an insulation layer, that box is selling mats.
  4. 1 in polyiso from Lowe's on the flats — floor, ceiling bays, any wall section that is actually a plane. Foil-faced. Tape the seams.
  5. 3M Thinsulate last: sheets on the walls and ceiling where spray adhesive holds, plus the thin strings stuffed down the remaining rib channels.

That is the stack. Not six mystery layers. LizardSkin, wool, Kilmat, polyiso, Thinsulate.

Why each layer is there

LizardSkin / TEROSON first because a Sprinter's interior paint is not a thermal break and the first summer in a white high-roof still cooks the skin. Ceramic coating on metal is the cheap, thin thing you can only do while the van is empty. Do it after you degrease, before anything you would have to mask around a battery rack.

Havelock in the cavities because wool fills the weird Sprinter voids — C-pillars, door pockets, the spaces around factory harnesses — without leaving a triangular air gap the way a square of polyiso does. Wool picks up more moisture overnight than Thinsulate and dries slower. That is why wool is the cavity fill, not the last layer, and why the MaxxAir and the Arctic Tern are not optional decoration. We ventilate. The wool is allowed to dry.

Kilmat next on the drum panels — walls, ceiling flats, doors. 25–30% coverage on the panels that boom is enough. Full-sheet coverage is weight for no extra quiet. This is the one layer people skip because it does not show up on an R-table.

1 in polyiso on the flats because that is the R-per-inch and the vapor story. About R-6 per inch, cheap, cuts with a knife, zero moisture pickup. Floor especially — you stand on this. Wool under a subfloor is a crushed batt.

Thinsulate last because it is the layer you can spray-adhere to a finished cavity, it is hydrophobic, and it is what actually quiets the highway. Wool in the nooks. Thinsulate on the surfaces that need adhesive. The leftover rib channels get the Thinsulate strings. Those channels are thermal bridges if you leave them hollow.

Materials

  • LizardSkin ceramic insulation and LizardSkin sound / Henkel TEROSON Thermal Control IDH 3124339, plus the sprayer they tell you to use
  • Havelock wool batts, 16×48×2 (R-7 on the batt)
  • Kilmat sheets
  • 1 in foil-faced polyiso, Lowe's, enough for floor + ceiling flats + any flat wall
  • 3M Thinsulate SM-style sheets plus leftover for rib strings
  • 3M 90 (or 76/77/78 if 90 is gone) spray adhesive for Thinsulate
  • Foil HVAC tape for polyiso seams
  • Great Stuff or equivalent only at polyiso edges and the ugly lower-body voids — not as the whole wall
  • Rust-preventative paint for every new hole edge (roof, walls, floor penetrations)
  • Degreaser / alcohol, respirator, gloves, eye protection
  • MaxxAir already in the roof plan, Arctic Tern already in the roof plan. Ventilation is part of this materials list.

Tools

  • Putty knives and a roller for LizardSkin
  • Sharp fabric shears for wool and Thinsulate (tailor's scissors, not kitchen shears)
  • Utility knife and a straightedge for polyiso
  • J-roller or a hard plastic smoother for Kilmat
  • Foil tape gun or just patience
  • Shop vac every night. Metal chips rust.

Install order — do not skip around

Metal prep, then the layers that bond to metal, then the fill, then the board, then the last fiber, then you stop making holes. We ran it like this.

1. Finish the holes first

Nomadic 14×14, Arctic Tern cutout, MaxxAir, any solar gland, any roof-rack interior access. Paint every raw edge. You are about to hide the metal. The conversion page has the roof map. If you insulate first and cut second you will fill the shop-vac with wool and swear at the ceiling for a day.

2. Strip and clean

Everything that is not factory metal comes out. Degrease. The LizardSkin will not stick to wax or silicone. Pull the factory headliner and the door cards. This is also when you run any wiring chases you can still see. Wire before you bury the walls.

3. LizardSkin / TEROSON on bare metal

Mask what you will still need as a ground or a bolt hole. Spray or roll the ceramic, then the sound coat, at the thickness on the can. Let it cure the full window. This is messy and it is the last time the van looks like a cargo van. Do walls, ceiling, doors, and the lower panels. Skip the floor if you are about to set polyiso on it — the floor wants board, not a flexible coat you will crush.

4. Kilmat on the drums

Big flat wall panels, ceiling flats, door skins. Roll it out hard so you do not leave air bubbles that rattle later. You are killing low-frequency boom. The wool and Thinsulate handle the higher stuff.

5. Havelock in every cavity

Tear or cut batts to the cavity. Stuff pillars, ribs, wheel-well voids, the spaces around factory looms. Fill, do not pack. A crushed batt is a thinner batt. Hold it with a bit of tape or string until the next layer or the wall panel traps it. That is the only way wool behaves in a Sprinter.

6. Polyiso on the flats

Floor: 1 in board between the floor ribs or on sleepers, edges foamed, then the subfloor. We used Lowe's 1 in. Do not use wool here.

Ceiling: 1 in between roof ribs where it will friction-fit, foil tape on every seam. High roof gives you the inch. Do not eat standing height with 2 in unless you have already sat in the van with a 2 in mockup.

Wall flats: cut to the plane, not to the curve. The curve still has wool in it.

Foil face toward the living space if you are using it as the vapor layer. Tape every seam. A 1/8 in gap is a chimney.

7. Thinsulate sheets and rib strings

Spray the metal or the polyiso, spray the white face of the Thinsulate if 3M 90 is what you have, wait for tack, press. It really is a weekend once the wool is in. Cut one piece per bay when you can. Butt joints get foil tape.

Whatever will not take a sheet — the leftover rib channels — gets the thin Thinsulate strings. Those ribs are the thermal bridges. Leaving them empty is how you get cold stripes on the clay later.

8. Doors and lower body

Door cards off, Thinsulate or leftover wool in the cavities, cards back on. Sliding door is the biggest uninsulated hole in most builds. Lower panels and wheel wells get leftover wool plus a conservative shot of can-foam in the voids you cannot stuff. This is the condensation belt.

9. Stop. Ventilate. Frame.

MaxxAir on. Tern closed or cracked as the weather wants. Then 80/20, then electrical, then Brittany's walls. Do not hang cabinets on a wall you have not insulated behind.

Zone cheat sheet

  • Floor — 1 in polyiso, then subfloor. Nothing compressible.
  • Ceiling — LizardSkin, Kilmat on flats, wool in ribs, 1 in polyiso in bays, Thinsulate over.
  • Walls — LizardSkin, Kilmat on drums, wool in cavities, polyiso only where it is actually flat, Thinsulate sheets.
  • Ribs / pillars — wool, then Thinsulate strings. No hollow metal.
  • Doors — Thinsulate behind the cards.
  • Wheel wells / lower — wool + careful foam. This is where parked-van condensate lives.
  • Garage — same stack on the metal, then 80/20. The EcoFlow and Comfort Hot sit in an insulated box, not a raw shell.

Gotchas

  • Kilmat is not a sixth insulation layer. It is sound deadening. Say that out loud before you buy a third box of it thinking you are adding R.
  • Compressing Havelock to make a batt fit is how you spend wool money for foam performance.
  • Reflectix glued to metal does nothing without an air gap. We did not use it as the wall.
  • Closed-cell spray foam as the whole van is a valid nuclear option and a nightmare the day you need a wire. We did not foam the van shut.
  • Paint every cut. Metal chips in the wool rust.
  • The fan is part of the insulation system. A MaxxAir on low at night is not wasted power. It is how the wool dries.
  • Do this before the bed frame. You will not spray LizardSkin around a finished Independence Kit.

Power that sits in this shell: EcoFlow page. Roof that dumps the heat this stack cannot kill: AC page. The rest of the van: conversion page.