
xis ok

We may earn a commission if you buy through links on this page, at no extra cost to you. We only link products that are actually in our van (or clear shopper alternatives we name as such).

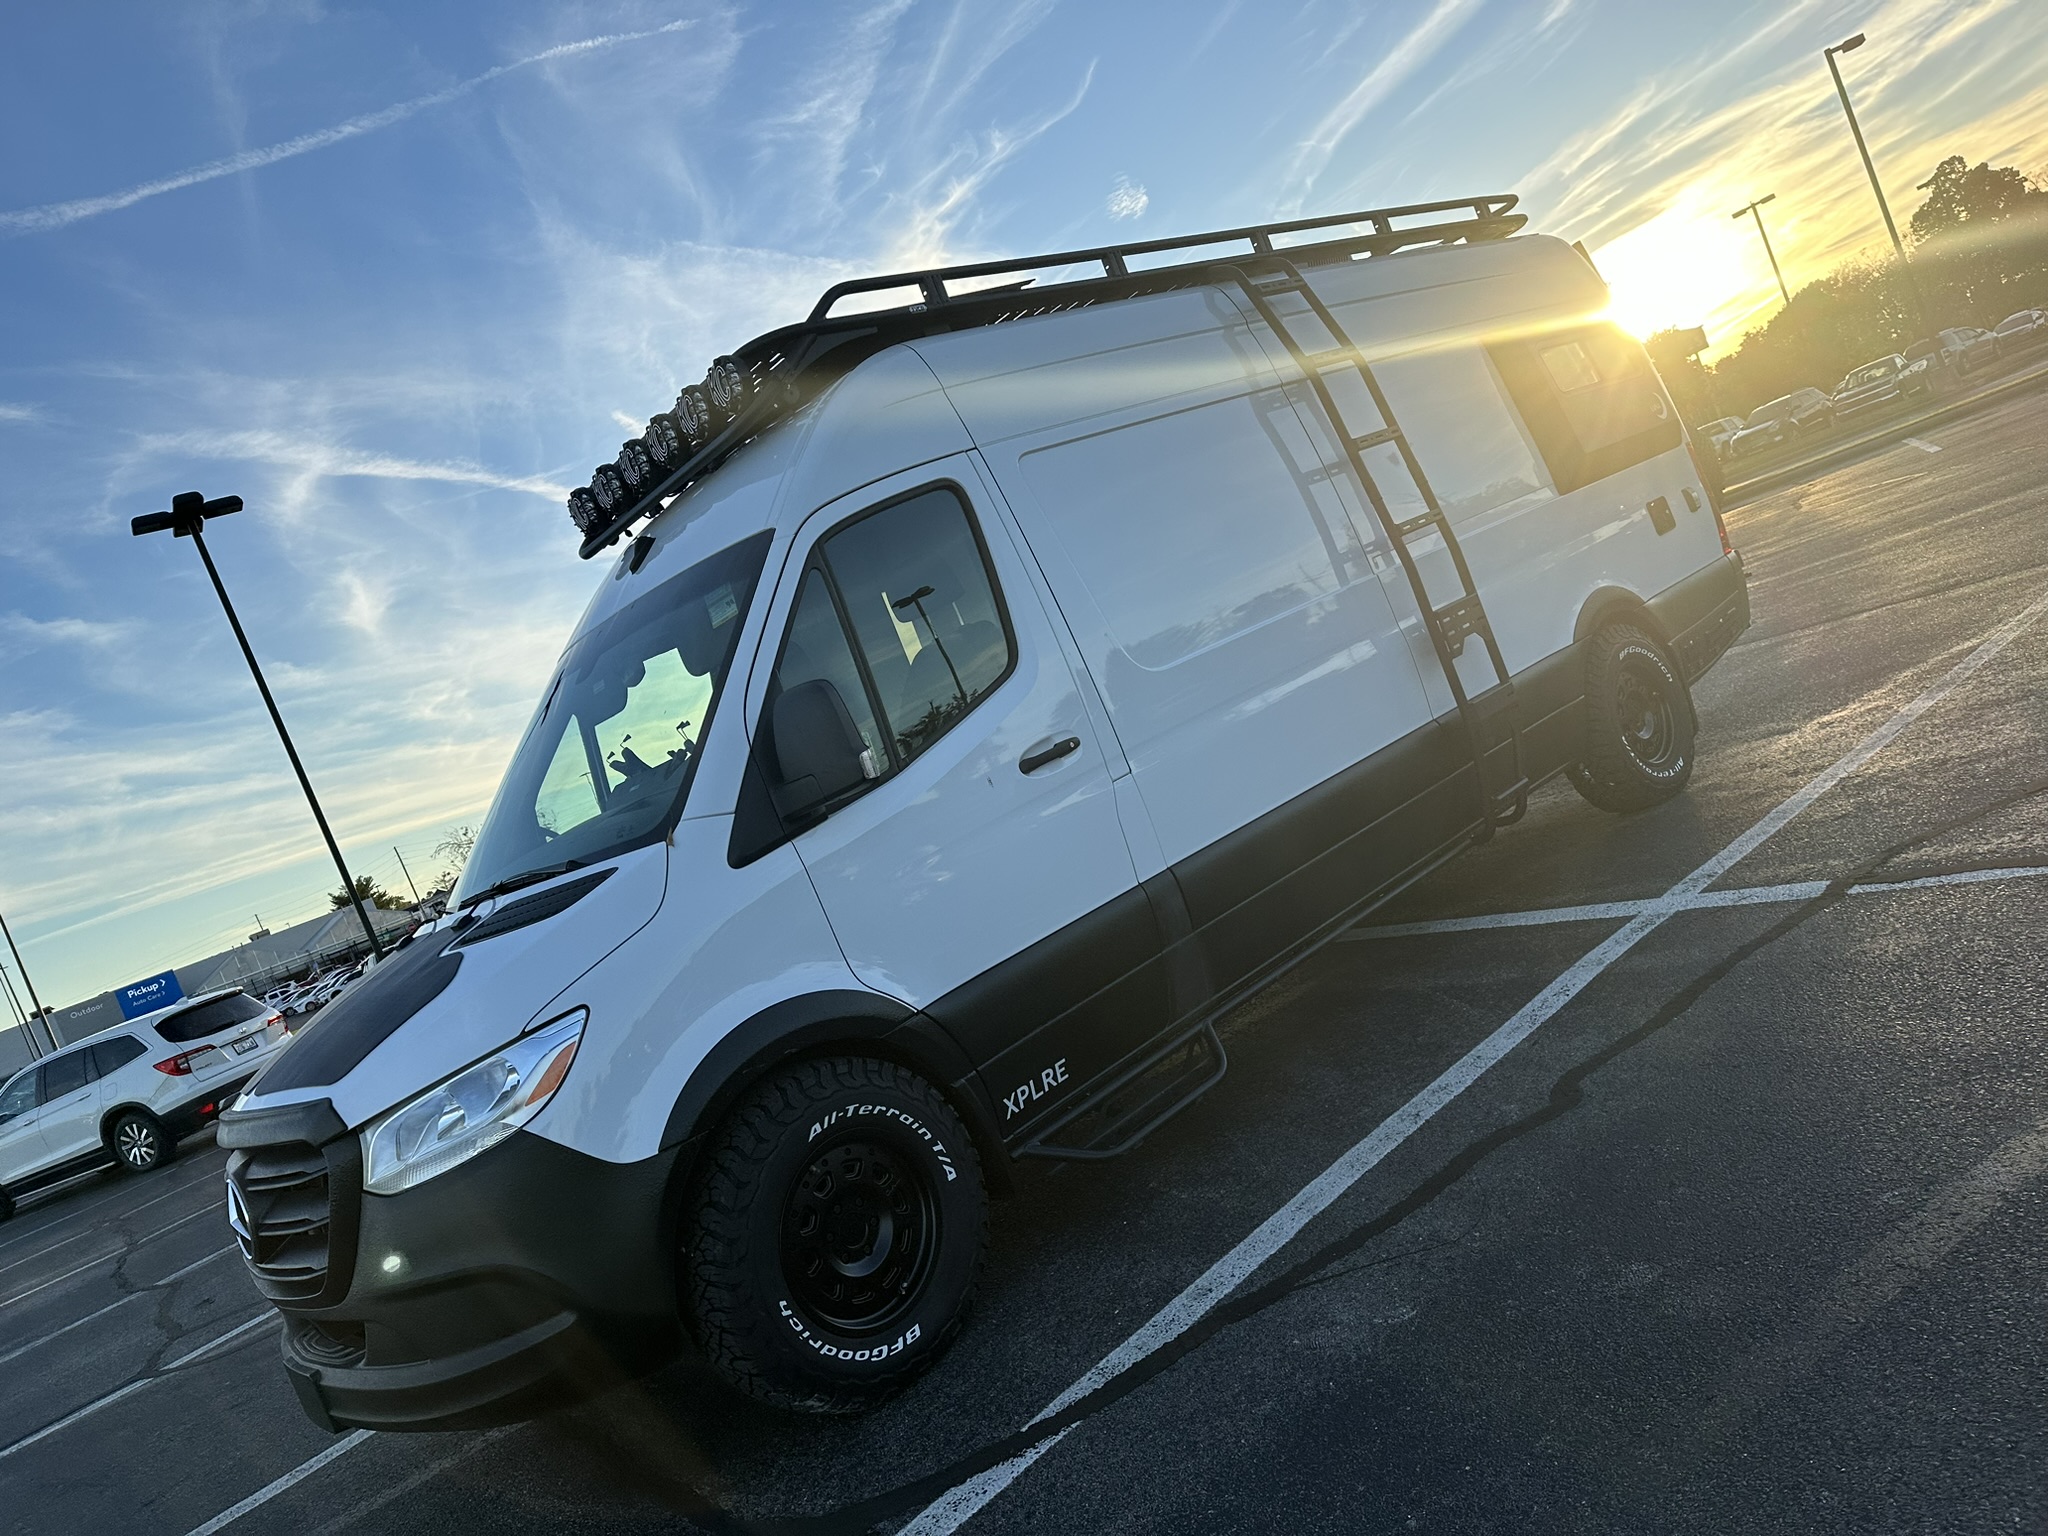
XPLRE is a 2021 Mercedes Sprinter 2500, gas, 170 in wheelbase, high roof. I designed the systems. Brittany designed the interior — Roman clay, wood, arches. We built it to live in: hike, leave HVAC on, Yorkie mix / tuxedo kitten / grey cat in the house, large dog in the garage with its own exhaust.

This page is the order of work and what is actually on the van. The procedures for power, insulation, and the roof AC are their own posts. Use those when you are in that part of the job. Use this when you are trying not to do the job in the wrong week.

The order we actually used

  1. Pick the chassis for the layout, not the other way around.
  2. Cut the holes while the van is empty.
  3. Sound and insulation on bare metal.
  4. Floor as a structure, not a leftover.
  5. Roof rack and solar before the ceiling closes.
  6. Electrical as a mechanical room, not a junk drawer.
  7. Walls and furniture last.
  8. Heat, water, and interior finish over a van that already works.

Why this chassis

Gas, not diesel. High roof so we can stand and so Brittany's arches have volume. 170 in so the garage under the bed is a real room — batteries, hydronic heat, water, and a dog — instead of a slot. Cargo length on a 170 high-roof is about 173.6 in on the floor. A 144 deletes the garage and moves the fight into the living space.

White body on purpose. Black hood wrap. We are not trying to look tactical. We are trying not to bake.

Must-haves before a floor plan

Ours, locked, before we bought a single cabinet:

  • Fixed rear bed with a real garage under it
  • Independence Kit 10kWh in that garage
  • Nomadic X3 24V on the roof, left running
  • Hydronic heat (Rixen's Comfort Hot), not a diesel air heater
  • Roman clay, wood, arches — Brittany's, not a gray wall kit
  • Animals: three in the house, one in the garage with exhaust
  • No asking the living space to also be the mechanical room

Tape the bed and the garage on the empty floor before you buy a single cabinet. Cardboard is cheaper than a second 80/20 order.

Do the work in this order

1. Punch the roof and the walls on an empty van

Flatline Van Co Safari rack, Sprinter 170 drop-front, SKU SP0108B, about 4 in off the roof, about $4,595. Landing pads on the factory points, then bars, then the fairing. Six round LED driving lights, black storage bin, Maxtrax-style boards on the driver side, driver-side ladder. Do this before the ceiling slats. You will not enjoy drilling a finished cedar ceiling.

Same week, while you still have a cargo van: Nomadic 14×14 over the bed, Arctic Tern electric skylight (receipt $1,905.88, opening about 500×700). Tern is discontinued. If you are cutting a skylight now, Dometic Heki 2 Deluxe 9104119560 is the honest shopper unit — larger cutout, about 960×655, manual crank, not a drop-in for our hole. MaxxAir reversible in the living space. Bathroom dome. Any solar gland. Paint every raw edge the day you cut it.

Windows if you want them, also now. We have tinted glass and a driver-side bed flare. Bonded glass is a hole-and-adhesive job. Do it before insulation so you are not trimming wool around a wet bead.

2. Strip to metal

Headliner out. Door cards off. Factory floor kept as a template if you have one. Shop-vac the chips. This is also when you decide the wiring chase. You will not enjoy fishing 2 AWG behind clay.

3. Sound and insulation

Full stack and the why are on the insulation page. Short version: LizardSkin ceramic + sound (Henkel TEROSON Thermal Control IDH 3124339) on clean metal, Havelock 16×48×2 (R-7) in the cavities, Kilmat on the drums (sound only), 1 in Lowe's polyiso on the flats, 3M Thinsulate sheets plus rib strings last. Floor is polyiso, not wool. MaxxAir is part of this system.

4. Floor as a structure

1 in polyiso, then a real subfloor, then the finish floor. Sleepers, board, ply, finish. Plan any underslung tank or spare-tire move before you screw the ply down — a late Comfort Hot exhaust or a grey-tank hang is the same headache as a late LPG hang.

5. Frame the garage / bed in 80/20

Black 80/20, plywood lid. This is the mechanical room. Right: two EcoFlow 5kWh modules and the Power Hub. Left: white fresh-water tank in 80/20, Rixen's Comfort Hot, blue/red PEX. Induction exhaust for the large dog. Wooden rear partition with a large arched opening into the living space — Brittany's, and it is how you service the bay after the lid is on.

Dry-fit the batteries before you commit the ply height. The Independence Kit does not shrink.

6. Electrical, live, before pretty panels

Independence Kit 10kWh, about $15k, variant 39946340565065. Two modules, hub, distribution panel, console. Install and the 48-to-24 Nomadic homerun are on the EcoFlow page. Get the hub talking, the console up, and the AC circuit protected before you hide anything in clay.

Hood: two flexible black solar panels on the wrap, into the hub PV input. Alternator on the included ALT IN with a breaker, using the Sprinter BEG, not a Transit photo.

7. Roof HVAC live

Nomadic X3 Standard 24V, Obsidian Black, white faceplate, DIY kit, about $4,677. 14×14, dual-layer gasket, hand torque, LCD before power. Procedure on the AC page. Acceptance test is the same as the electrical page: doors closed, AC on, we are on a trail.

8. Heat and water in the same bay

Rixen's Comfort Hot, silver reservoir, hydronic. Not a Chinese diesel air heater and not an Espar in the seat base. It lives on the left of the garage next to the white tank and the PEX. Carbon monoxide detector anyway — combustion is still combustion. Drop-out / exhaust per Rixen's manual, not per a forum diesel-heater diagram.

Fresh in the garage. Grey where you can dump it. We are not going to invent tank gallons we did not stencil on the side. Blue and red PEX, labeled, not the one that felt hot. Composting or cassette toilet in the wet-room — the brand plate is not the point of this page. Shower is Brittany's arched wet-room, not a plastic stall.

9. Walls, then furniture, then clay

Substructure on the ribs, then the finish. Brittany's language: cream Roman clay, wood-slat ceiling, floor-to-ceiling arches, guitar niche by the slider, wood-grain bathroom door, arched pet cutout at the kitchen floor. Kitchen: white push-to-open drawers, leather strap pulls, butcher-block / live-edge work surface, desert tile niche, black gooseneck faucet, microwave, black fridge, Breville on the counter. Gold oval mirror in the wet-room. Rust/orange bedding through the arch to the bed.

Cabinets in week one is how you insulate around furniture. Resist it. Systems first, even when the van looks ugly. That is the correct ugly.

Garage build, in the order that does not trap you

The 170 is long enough that the bed can be a lid, not a box. We treated the rear as a shop.

  1. After insulation, snap a centerline on the floor. Mark the wheel wells. The 80/20 legs sit inboard of the wells, not on them.
  2. Build the black 80/20 rectangle first, no ply. Set both EcoFlow modules and the Power Hub on the right rail and confirm you can still get a hand on the RJ45 ports and the 100A breaker. Set the white tank and the Comfort Hot on the left and confirm PEX can leave the bay without crossing a battery strap.
  3. Add the cross members that carry the plywood. Dry-fit the lid. The arched partition opening has to clear a person on their knees with a screwdriver. If it does not, the arch is pretty and the garage is unserviceable.
  4. Induction exhaust now, while the wall is still a hole. The large dog rides in this bay. Batteries and a hydronic heater share the air. A sealed garage is a bad science experiment.
  5. Land electrical and PEX. Then the ply. Then Brittany's wooden partition and the arch. Then the clay on the living side of that wall.

If the Independence Kit, the Comfort Hot, and the dog cannot share this drawing, the layout is wrong. Do not find a spot for the dog after the batteries look good on Instagram.

Brittany's interior, after the van already works

This is the part people start with and then regret. Cladding, then furniture. Ours, with her materials:

  1. Batten the ribs. Verticals first, then horizontals where a cabinet or an arch will land. Mark the batten locations on tape on the floor so you can still find them after clay.
  2. Ceiling slats before the high cabinets. The Nomadic faceplate, MaxxAir trim, and Tern ring have to land on a finished thickness you already chose. Do not float slats and then discover the X3 plate sits 3/4 in low.
  3. Kitchen carcasses in 12mm-class ply, push-to-open white drawers, leather strap pulls. Shelf heights for the things we actually own, not a generic pantry. Live-edge / butcher-block work surface. Desert tile niche. Black gooseneck. Microwave and black fridge in the openings we framed, not the openings a box store cabinet happened to have.
  4. Wet-room as an arch, not a stall. Gold oval mirror. Toilet. Shower that drains like a wet-room, with a real threshold. The arched pet cutout at the kitchen floor is load-bearing for the animals — they use it — so do not treat it as a styling hole you can move later.
  5. Roman clay last, on walls that are already closed, over a van that already cools. Clay over an untested AC circuit is how you redo a wall.
  6. Guitar niche by the slider, rust/orange bedding, the oval mirror, the leather pulls — those are the last 5%. They are also the reason the van does not look like a cargo conversion that got tired.

I do systems. She does the room. If a choice is easier-to-service versus the-arch-dies, we argue, then we leave a removable clay panel. The EcoFlow wall is that argument, settled.

What is on the outside

  • Flatline Safari SP0108B, ~4 in off the roof, ~$4,595. Lights, bin, Maxtrax-style boards, ladder.
  • White body, black hood wrap, two flexible hood panels.
  • Passenger-side black awning, black rock sliders / side steps, driver-side bed flare, tinted glass.
  • Aftermarket black steel bumper: fogs, winch, red recovery shackles.
  • BFGoodrich All-Terrain T/A KO2s on Black Rhino wheels.
  • XPLRE lettering behind the front wheel and on the side. Instagram is xplre.vanlife.

What is in the garage

  • Right: EcoFlow Independence Kit 10kWh (two modules + Power Hub)
  • Left: white fresh tank, Comfort Hot, PEX
  • Induction exhaust for the large dog
  • Arched opening into the house

What is on the roof

  • Nomadic X3 Standard 24V, Obsidian Black / white plate, DIY kit, ~$4,677
  • Arctic Tern electric (~$1,905.88). Shopper alternative: Heki 2 Deluxe 9104119560, larger hole, manual
  • MaxxAir reversible
  • Bathroom dome
  • Four small ceiling pods
  • Safari rack as shade and as a place to put lights, not as decoration

Gotchas

  • Holes, then insulation, then frame, then electrons, then clay. Reverse any two and you will cut a finished surface.
  • The rack is climate. Body stays white on purpose.
  • The garage is the van. If the Independence Kit, the Comfort Hot, and the dog cannot share it, the layout is wrong.
  • Tern is not Heki. Different hole. Do not order the successor and cut our cutout.
  • Acceptance test is a hike, HVAC on, animals inside. If that fails, the problem is insulation, airflow, or power — those three posts are linked above.

Deep dives: electrical, insulation, AC.